
The argument for tech stacks is simple: take your inconsistent, all-in-one solutions, replace them with the absolute best tools for each function, and then stitch them together. That’s of course an oversimplification, but the general idea remains.
If your martech stack is essentially just an amalgam of the best tools for the job, what do you do when you have two (or more) tools that just don’t communicate with one another? A successful tech stack relies on seamless interconnectivity, so herein lies the problem.
The notion of a “custom integration” is bound to make any seasoned Ops professional uneasy, but if you’re a marketing technologist, you know that’s exactly what needs to be done. The solution is to create a workaround. We encountered this very scenario a few years back, at which point we developed our initial Marketo <> Segment implementation. Since then, we’ve refined our process to stay ahead of product updates and new technology releases. Read on to learn how to tackle this tricky implementation — updated for 2022.
Table of Contents
What Do Segment & Marketo Do? Why Integrate Them in the First Place?
Segment is a leading tool in a (relatively) new space: customer data platforms (although Segment considers itself more of a Customer Data Infrastructure, but you get the idea). Think of Segment as your marketing stack’s data backbone. Its job is to translate and pipe customer data through a number of tools, from marketing automation, email marketing, CRM, analytics, BI and visualization, data warehousing, and more.
Segment is also part of a new wave of what’s referred to as event-based analytics, where specified user actions trigger tracking as opposed to launching every time a page loads. Common events include email opened, account created, product added to cart, feature used, or button clicked. It’s particularly useful to track page views as their own events, the data for which you can then tie out downstream with other session-specific information. This is a critical component of attribution modeling, among others.
Marketo is a top-rated marketing automation platform with the industry’s largest market share and years of history behind it. It’s well-known for handling lengthy workflows and arranging complex logic in email nurturing, customer segmentation, and lead management. It’s really the only automation tool in the MarTech ecosystem that has a decent Salesforce integration, which is a selling point in itself. Marketo thus serves as a great platform for data activation, via integration such as this one with Segment, or with Amplitude cohorts, or with account-based lead scoring systems.
Primary Benefits of Integrating Marketo & Segment
What does a smooth Marketo-Segment integration enable you to do? Why should you bother at all? The short answer: getting your marketing automation out of its data silo, feeding it with rich, actionable user insights, and making your data pipeline more efficient.
Integrate Marketo with Segment to get your marketing automation out of its data silo, feed it with rich, actionable user insights, and make your data pipeline more efficient.
To give you more food for thought, consider this non-exhaustive list of benefits:
- More robust web integration with Marketo, allowing you to track granular, custom user behaviors without needing to use a Marketo landing page
- Threading first-party touchpoint data from Marketo as a source into a data warehouse or an analytics tool, for example
- Using Segment’s more accurate Personas functionality for audience email list targeting, segment building, and journey mapping
- Enriched lead database that serves as a backup in case of data loss or other catastrophic failure
- Ability to collect data even when Marketo trackers get filtered out by ad blockers, specifically with leveraging server-side tracking calls
- Improved personalization of automated emails with the help of rich data from other tools, piped through Segment into Marketo as a destination
- Cleaning up data duplication when you have real-time data flowing through your stack, but Marketo only creates data in batches
- Use of Segment’s API instead of Marketo’s, which we find to be much more straightforward, flexible, and actionable
- Use Marketo as either source or destination of your CDP ingestion engine, not just a data endpoint or Salesforce conduit
- Additional logging and data quality checks to help ensure the data you’re collecting is accurate and reliable
Taxonomy as the Groundwork for a Successful Integration
We always begin our marketing integration projects with an event taxonomy document, which clearly outlines all of the events we’re tracking, where the data is coming from, and what are all of the individual properties to track for each.
This makes sure everyone is aligned on what naming we use for events, triggers, and other essential details about the event or end-user. This also serves as a point of reference for the duration of the project, acting as a source of truth for naming conventions, tracking properties, and other considerations.
MarTech integrations have many moving parts and will be managed by multiple team members over a long period of time, so it’s critical that you establish clear guidelines and a system of governance for all parties to follow.
Establishing a taxonomy specification document up front sets clear expectations for processes and conventions, and will certainly save you time (and headaches) down the road. All it takes is one rogue team (or individual) using their own conventions and definitions for your data to suddenly become muddied and unreliable.
For best practices in building taxonomy documents, grab our spec template or learn how to make one by watching our webinar on the topic. The spec template is the foundation of the one we use in our client work, and the webinar is a recording we use in our own internal training.
The template sheet was first made for a client of ours, and now it’s free for you to use, so you can get a head start with Segment. Grab it here.
Integration Issues with Marketo Out of the Box, and How to Work Around Them
As is usually the case, an obvious starting point is going to be the integration instructions for the particular destination. Segment’s own guide for setting up the Segment and Marketo integration is fairly straightforward and easy enough to follow. You can safely walk through the steps outlined in the instructions to connect the systems and get them to communicate with one-another to a reasonable degree of confidence.
However, there are some caveats to navigate with this particular connection, specifically as it pertains to data governance and cleanliness. An out-of-the-box integration can lead to some significantly inflated API calls, which subsequently lead to reaching the API limit much sooner than you would otherwise. Additionally, the default configuration only scratches the surface regarding preventing duplicate records and leaves a lot of room for dirty data to slip through the cracks.
Accordingly, we broke the integration between Marketo and Segment into a handful of steps that we’ve deemed to be the most important. Critical as they are, if there are any steps you follow when setting up the connection, these should be them.
- Enable Cloud Mode
- Identify the User in Marketo Before Sending Segment Track Calls
- Map All Events Accurately
- Match the Marketo UI key with the Marketo integration key
- Mapping Segment Identify calls & traits
- Fix Lead Duplication in the Data
- Remove the Marketo API responsible for sending leads, and just use Segment
Let’s go through these one by one.
1. Enable Cloud Mode
Segment has two connection modes: “Device Mode” and “Cloud Mode.” The primary difference between these two connection types is that Device Mode loads the tracking script client-side and sends the tracked data directly to the destination. Conversely, Cloud Mode collects the activity data and sends it to Segment first, which then relays that data to the Marketo destination server-side.
An easy way of thinking about it is in terms of where the data is coming from. If the client is sending the data directly to the data destination, it’s Device Mode (the device in this case essentially being the browser). If the data is being sent from Segment to the destination, it’s Cloud Mode (Segment being in the cloud, so to speak).
Accordingly, make sure you’re setting the integration up in Cloud Mode so that the data is relayed server-side.
Segment’s cloud mode must be enabled for the Marketo integration
To enable cloud mode, navigate to ‘Sources,’ click ‘Marketo Integration,’ and look for the ‘Connection Mode’ option. Turn on cloud mode.
2. Identify the User in Marketo Before Sending Segment Track Calls
Almost all event-based Martech tools use a .track() call to record event-based actions. You’ll first need to identify your user in Marketo before you can get Segment to send track calls.
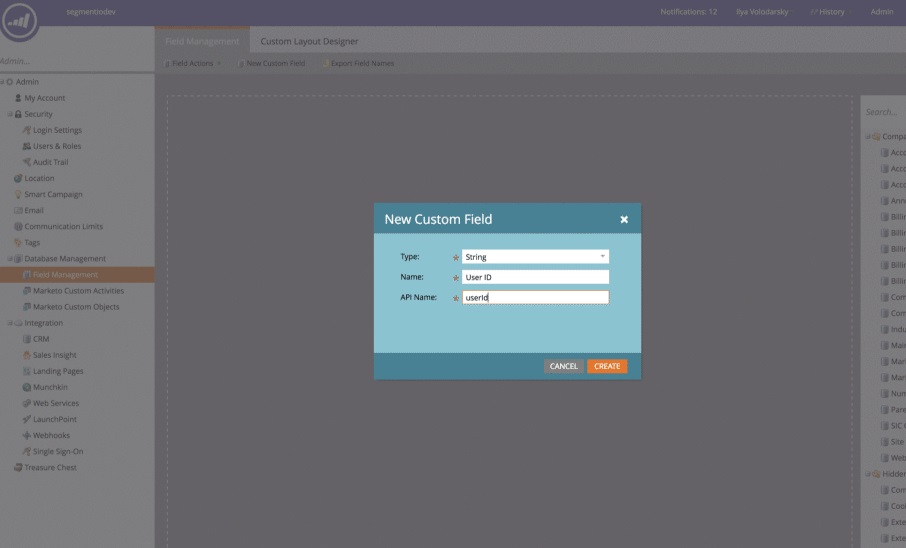
To do so, go to ‘Admin,’ then ’Data Management,’ and finally, “Create a New Field.” Enter these values for the three required fields:
- Type: String
- Name: User ID
API Name: userid
You’ll need to include these fields to identify your user in Marketo
Once the field has been created you can use Segment’s identify call to send the userid property and associate the event activity with specific records already in the lead database.
3. Map All Events Accurately
Before sending any data, you must first make sure custom events and properties are mapped correctly.
Unfortunately, Marketo can’t automatically detect the events or event properties passed down to it. Each must be created as a custom field and mapped in Segment.
For an example of how this works, assume that we’re running a vacation rental website, where a typical event might be account creation.
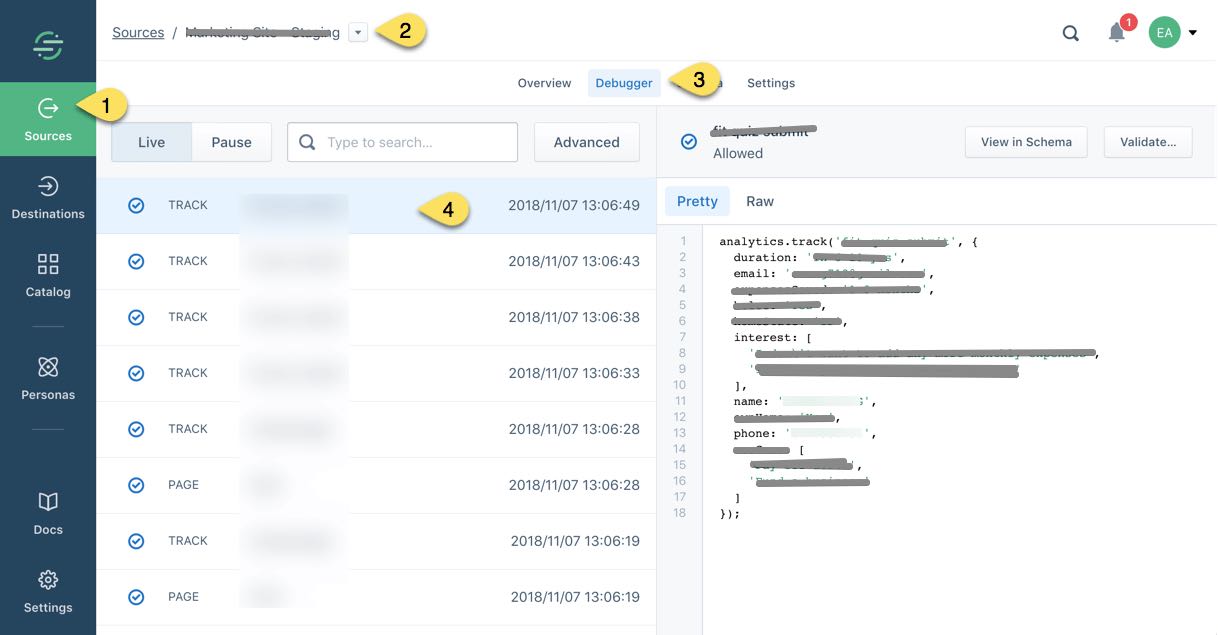
First, log in to Segment, hit ‘Sources’, and select the appropriate source to get started. Next, navigate to the debugger and click the event in question.
The sources dashboard in Segment
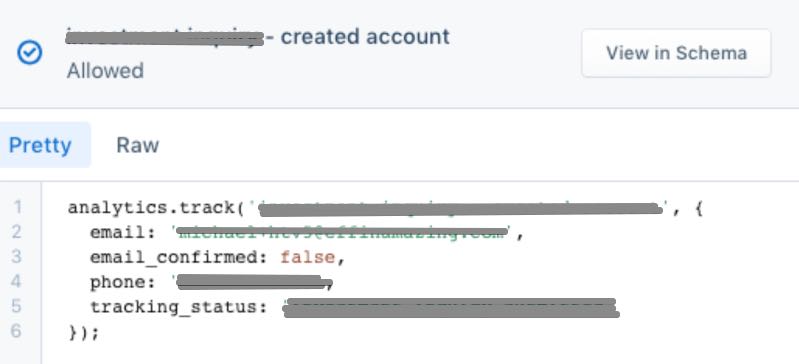
The image below is what you might see if you click on the event “rental inquiry – created account” and the respective property, “tracking_status,” in Segment.
Tracking status screen in Segment
The key consideration here is that data won’t fire unless we define and map the event name and property consistently across Segment and Marketo.
Marketo limits your API interactions, which can get extremely expensive or block the flow of data if you’re mapping really chatty events.
If you follow the standard Marketo-Segment implementation without thinking it through, and just map all your events, you’ll either spend more money or hit your API call limits. You may then create duplicate records, or experience that your data doesn’t get sent at all.
These are problems that we see fairly often through our work with our clients. To avoid them, just follow this guide.
| Your personalization is dead without the right stack taxonomy |
| Watch our free webinar |
Match Marketo UI & Integration Key
When setting up the Marketo and Segment integration, it’s important to make note of the common primary key prior to setting things up in either system. If you create a custom activity in Marketo and define the wrong field as the primary key, or do the equivalent in Segment, you have to go back and start over which is time consuming and oftentimes frustrating.
If you already have the custom activity created in Marketo and are simply mapping Segment to it, you can navigate to the specific field in Marketo and confirm which is the primary key that you need to use in Segment.
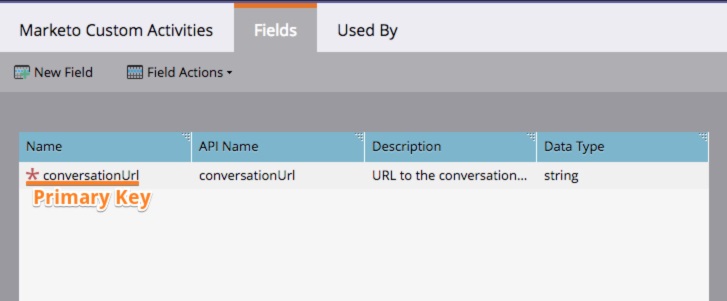
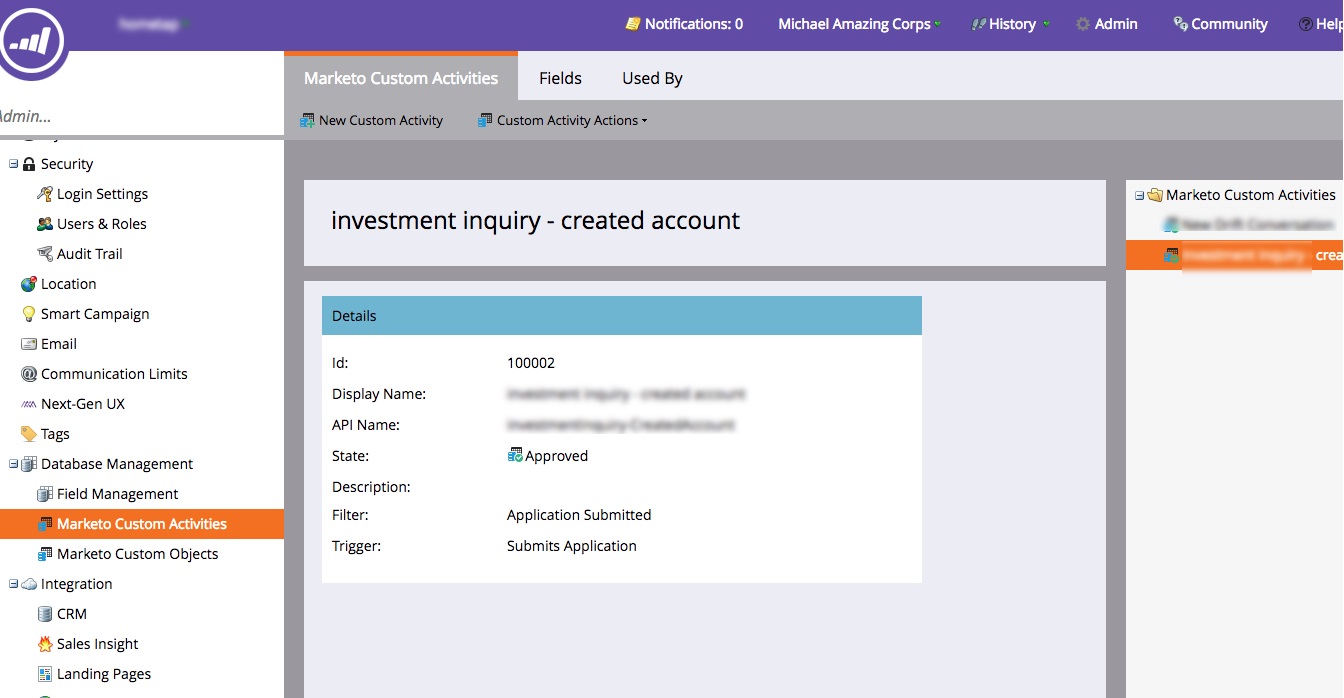
To find your primary key in Marketo, go to ‘Admin’ then ‘Custom Activities.’ Your ‘API Name’ is the primary key, and the asterisk next to the name denotes that it’s a required field, referring to it being the primary key.
Our primary keys for both Segment and Marketo should match
You’ll want to go through and create a separate field on the custom activity for each individual event property you want to track. Since you’ve already delineated what the primary key is, the remaining fields should not be marked as such.
Once created, the Custom Activity in Marketo should look something like this. Take note of the Id field, as you’ll need this later when setting up the Marketo integration within Segment itself.
Marketo displaying the recently-created custom activity
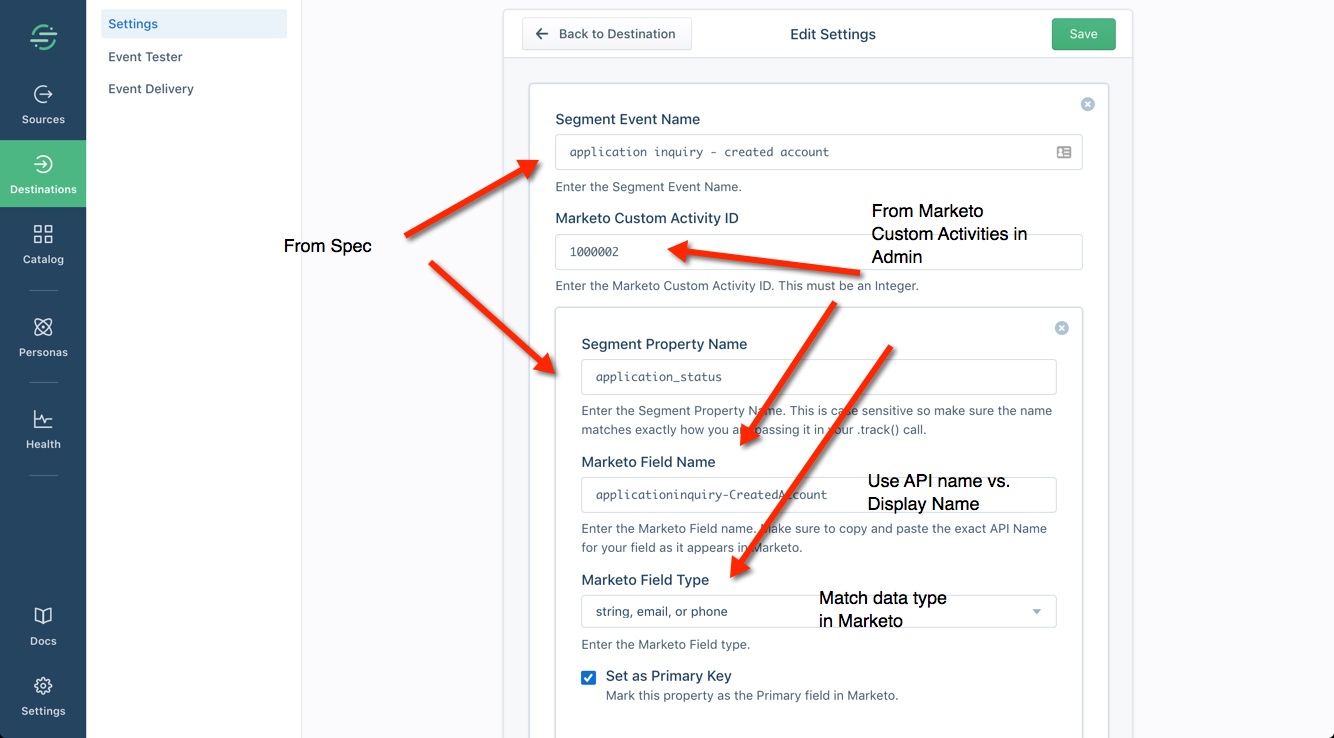
Back in Segment, you now will want to add each property to the corresponding mapped event. If you haven’t already, add the mapped event to Segment and past in the Custom Activity ID from earlier. Then, for each event property, add the property details in the fields in Segment. The `Segment Property Name` field needs to contain the Marketo field’s `API Name` value.
Generally the first field you map is going to be the primary key between the two systems, so make sure you check the “Set as Primary Key” checkbox if this is the case. (This is not required but it does help keep things organized and easy to interpret).
Once you’ve set up the event and the event property, this is how the mapping should look in Segment:
Segment screengrab showing the proper mapping configuration
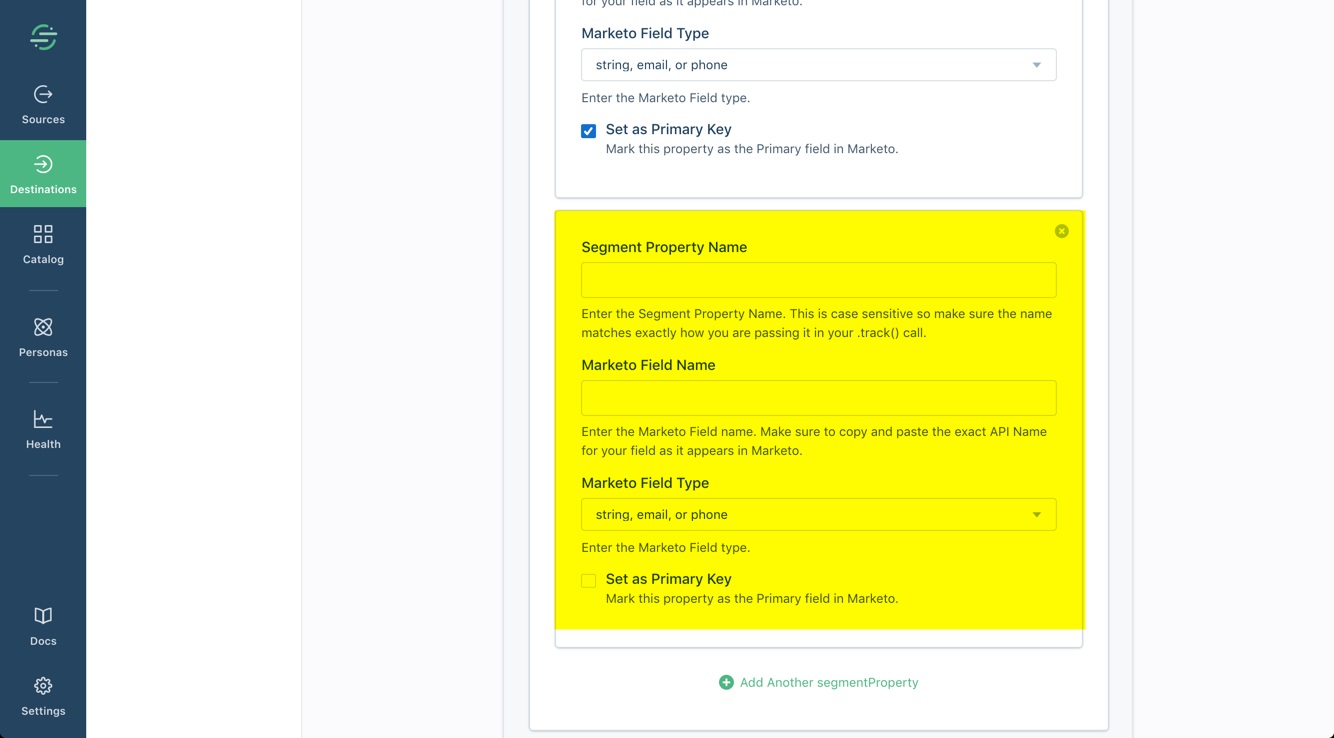
Similar to setting things up in Marketo, you now get to complete this process for every property you’re tracking for that particular event, for every event -— how fun! The only difference is that you aren’t going to check the “Set as Primary Key” checkbox for the subsequent event properties you’re setting up, assuming you’ve already defined the primary key in the first property you defined.
You can add multiple sets of Segment Property Name and Marketo Field Name
Mapping Segment Identify Calls & Traits
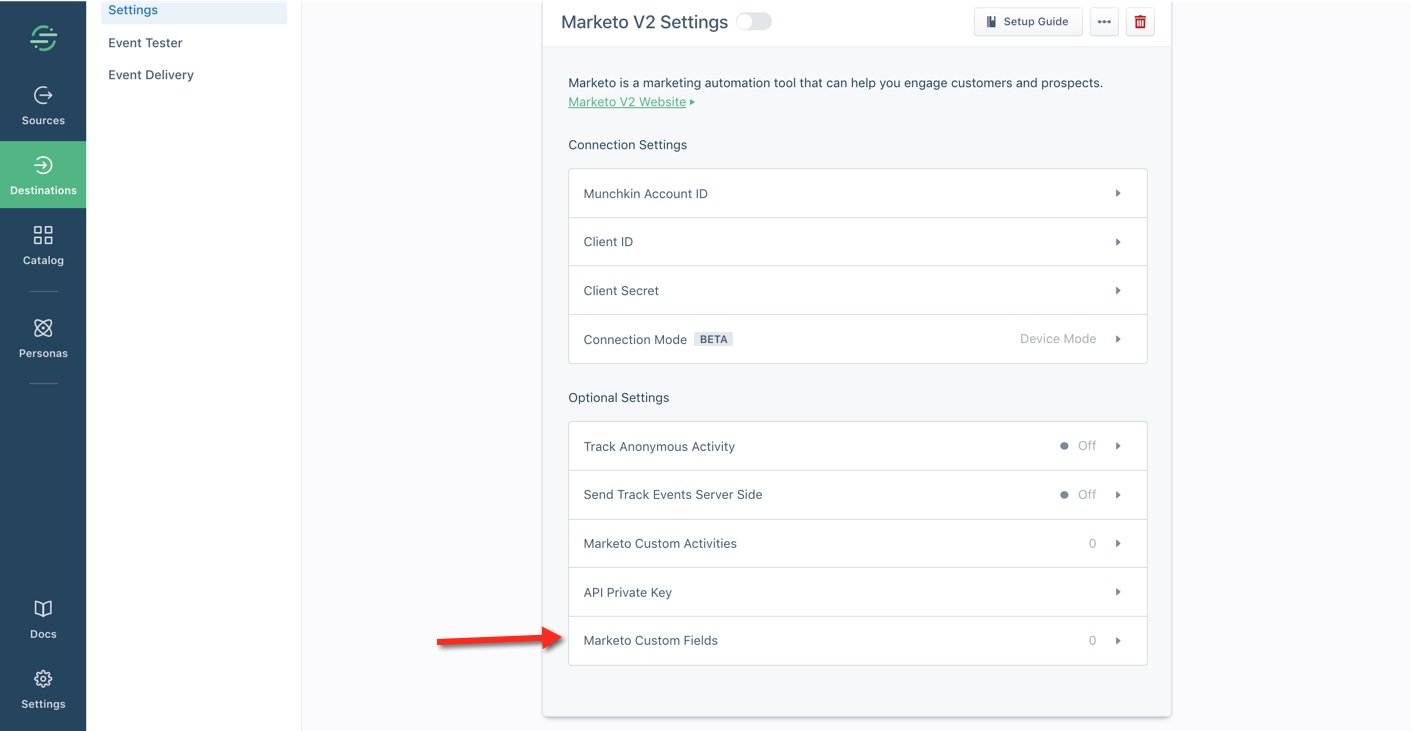
With Segment track calls mapped to Marketo custom activities, you’ll now want to shift your focus to Segment’s identify calls and their associated traits. In the Marketo settings within Segment, you’ll find “Marketo Custom Fields” at the bottom of the available options. This is where you will define the aforementioned traits.
Destination settings for the Marketo integration.
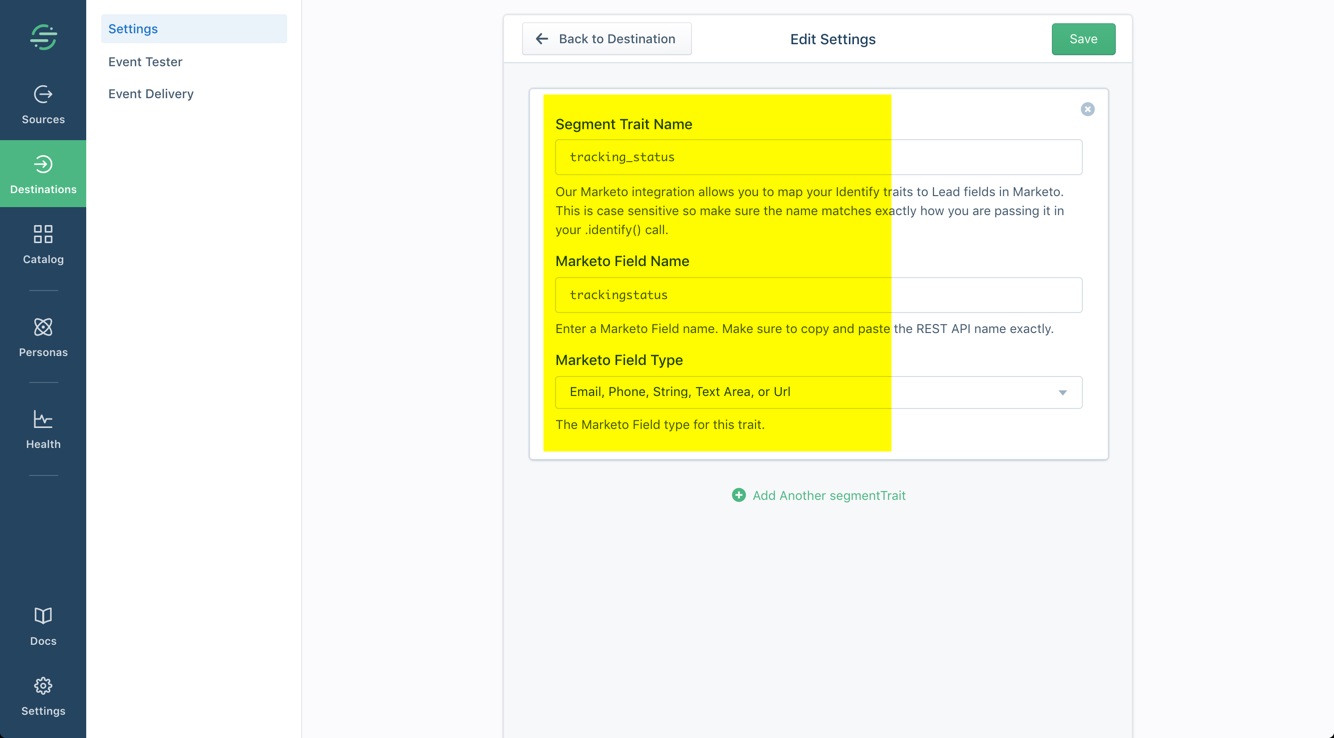
Once you click “Marketo Custom Fields” in the Segment connection, you should be seeing this screen:
Field for setting up traits from Segment identify calls
Just like you did with the event properties, you’ll want to go through and create a custom field mapping for each individual identify trait you’re wanting to track. Regardless of the traits, there are two custom fields that you need to map to Marketo: `userId` and `anonymousId`. Without those two fields, Segment’s integration with Marketo will not work at all, so you should have two custom fields created at the very least.
Generally the fields that you’re mapping will have already been created in Marketo, so this should just be a matter of creating their equivalents within Segment. However, if you’re planning on mapping a trait to a field that does not yet exist, make sure you create it in Marketo first, and then go to Segment and create the mapping.
For each trait, fill in the corresponding fields. You want to ensure the syntax of the data you’re entering is exactly the same as it appears in Marketo. This is specifically referring to the “Marketo Field Name” field and the “Marketo Field Type” field. The “Marketo Field Name” is the exact formatting of the API Field Name in Marketo, and the “Marketo Field Type” is the same as the Data Type value in Marketo.
Go through and create a custom field for each trait, adding more by clicking the “Add Another Segment trait” link.
4. Lead Deduplication
As mentioned previously, duplicate records is a recurring theme with the Marketo integration, specifically as it pertains to the initial sync and how Marketo processes requests.
Marketo ingests API requests in a “batched” format, meaning it isn’t processing the requests in true real time. In one of our implementations, we were helping a client troubleshoot issues with the Marketo setup and this was exactly the culprit – Segment would send identify calls but Marketo wouldn’t process them immediately, and was receiving API calls from other systems in the interim. It’s because of this tiny processing delay that duplicate records were being created.
To solve this, we ended up removing the API connection between Marketo and the other tool, so that Marketo was only receiving these requests from Segment’s identify calls. There’s no getting around Marketo’s batched processing functionality so the best workaround is to control what tools are sending data to Marketo and making the necessary configurations.
Funneling everything through Segment ended up resulting in better data quality as well. Segment has a lot of duplicate record management built in under the hood and, combined with identity resolution functionality, provides a lot of benefit in being the source of truth for this kind of data.
Get Implementation Help
As with any implementation, a lot of the nuance depends on your particular stack and the configurations therein. While the Segment connection to Marketo is fairly streamlined, there are a handful of pitfalls and setup considerations that can make the integration result in some fairly unwelcome results. Your lead database might be flooded with duplicate records, or your Marketo API call limits might be reached due to an influx of unnecessary identify and track calls.
It’s because of this that companies come to us for help in connecting Marketo with Segment. We encourage you to reach out for a free consultation with one of our experts if you have any questions or would like any assistance with your stack setup.
| Use our free in-house tool to plan out your stack, and even set the budget for it. |
| Visualize your stack |


Leave a Reply