
Google Analytics (GA) is the most used analytics system on the web, so most companies are using it or have used it in the past. In our years of experience as analytics experts, we’ve found that most companies have implementation issues with Google Analytics, and many of those issues can be fixed with only a few changes in strategy. We at McGaw.io pride ourselves on implementing complex analytics systems to get the data we need in order to optimize a site and see growth opportunities, and we’re ready to share our secrets with you.
This post is the first of a series that will walk through how to setup GA to kick ass and offer your company the best insights possible.
Step 1 – Google Tag Manager isn’t scary, it’s your friend…Get it on your site.
Google Tag Manager (GTM) is free, dynamic—and it makes you look cool in front of your friends. Think of it as the best wingman possible for an analyst or marketing team.
You can use it to launch any type of third party tags on your site without having to wait weeks for your developer.
Google Tag Manager can also wreak havoc on your site if you’re not careful with your implementation. Just like any other piece of code on your site, you need to put GTM through a Quality Assurance process before launching any tag. We’ll walk through that in a sec…but first, we need to get the effing tag on your site!
So, sign up for Google Tag Manager. Once you do you’ll get the following screen:
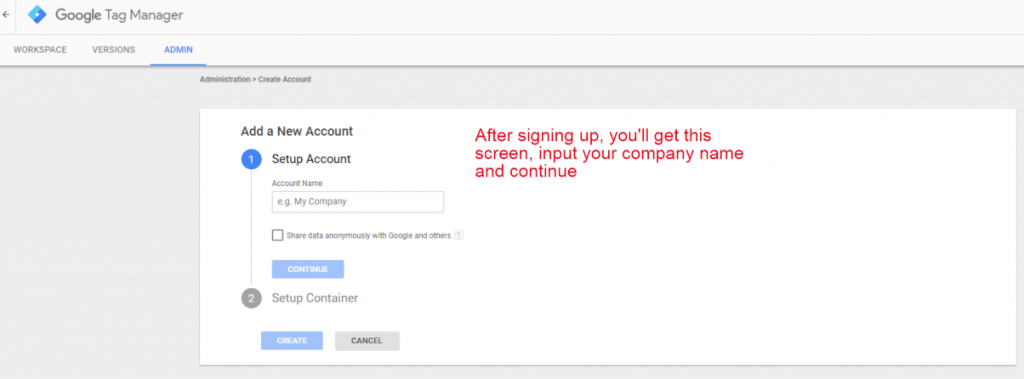
Input your company name and press continue. The next screen is where you’ll need to set up the specific container for the account:
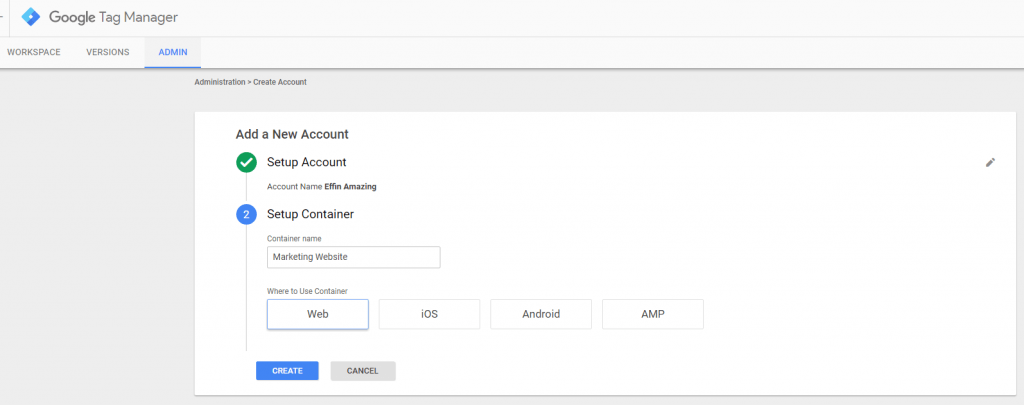
GTM can be used for all sorts of apps and websites, but for now, we’ll just focus on implementing it on a website.
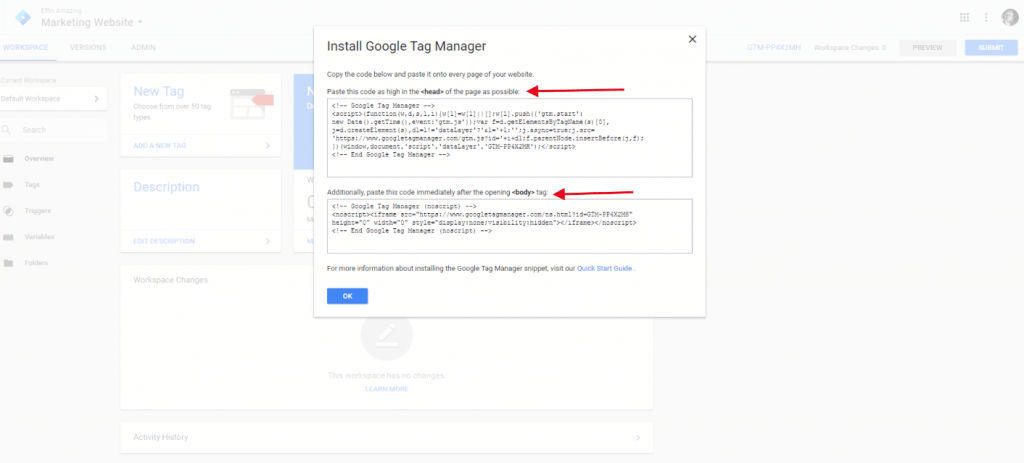
After all the initial setup is complete, you’ll get to a screen that shows the code you need to install on your site (see below). This is almost identical to the Google Analytics tag, but there are a few key differences.
- First, GA needs to be implemented in the <head> of the site, while GTM is implemented in the <head> and the <body> of the site (see instructions in the next image).
- Second, the GTM snippet will not be changed like a GA snippet of code, which changes the way data is flowing into the system. Instead, all changes to the code will happen inside of GTM.
- Third, it is ***VERY IMPORTANT*** to note that if you already have GA on your site, you’ll want to take it off after the GA tag is set up and running in GTM. We don’t want to double count traffic or lose traffic, so you’ll need to choose a time when you can make all of these changes at once.
Once you have GTM installed, then it’s time to set up your GA implementation inside the new container.
Step 2 – GA + GTM = <3. GA and GTM were made for each other.
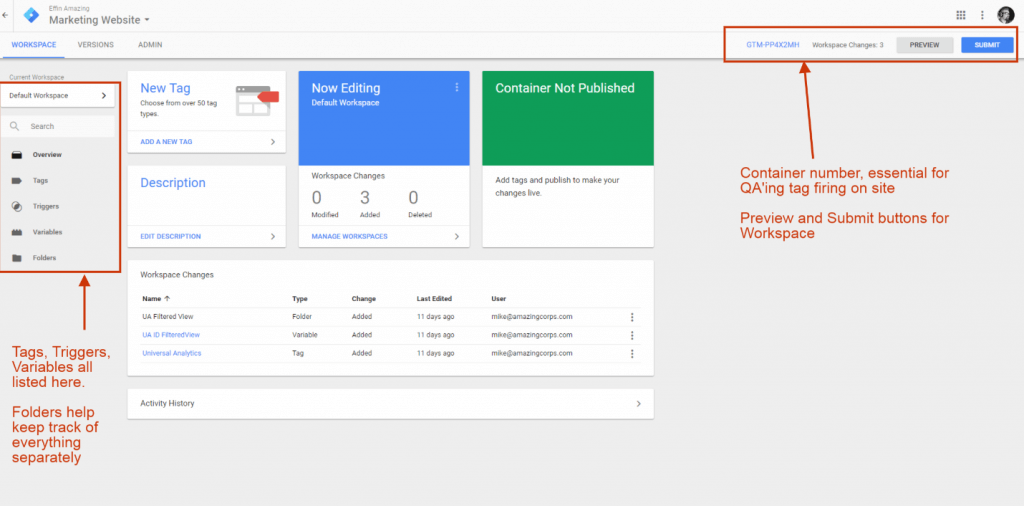
Now that your container is all set up, let’s take a peek inside the system (see screenshots below):
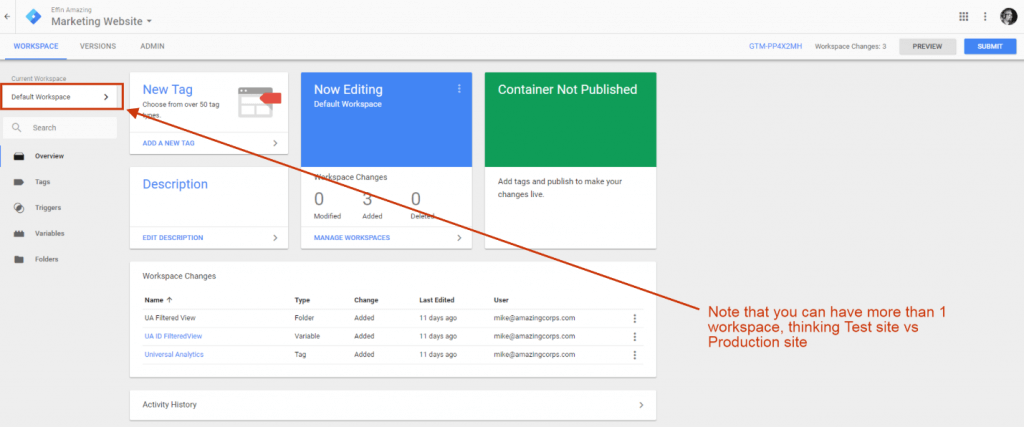
- Workspace, Version, Admin: These are the three main sections of GTM that allow you to toggle between different tasks, like assigning new users. There are different Workspaces that you can utilize for different environments of your site (for example, think a Dev site vs Production).
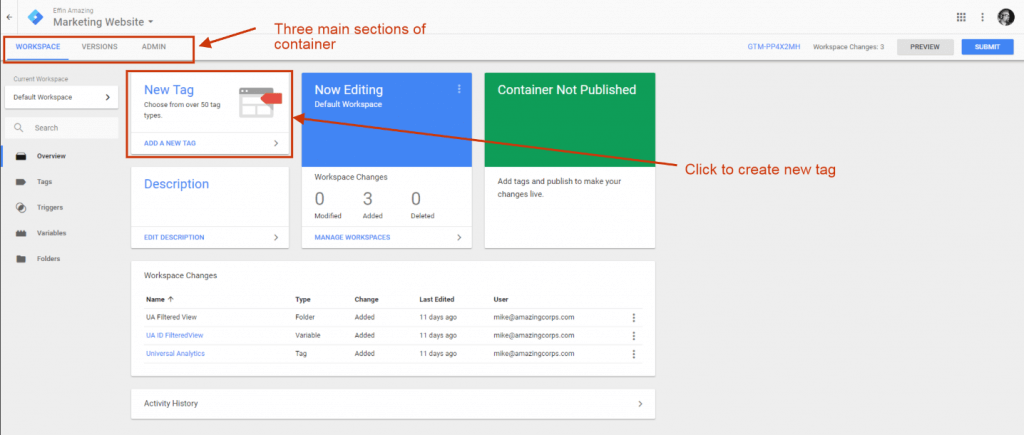
- Left Navigation (Overview, Tags, Triggers, Variables, Folders): The left navigation shows the main components of the container.
- Tags are the individual scripts that are going to fire on your site to collect data for third party systems.
- Triggers are the firing rules that tell the tags when to fire on your site. These are based on different variables and actions on your site and can include click events, page views, or a page load.
- Variables come in many different forms. This is where a lot of the meat of GTM is because you can build very customized javascript variables that fire through the datalayer to collect data that otherwise wouldn’t be possible. For our example here, we’ll focus mainly on the page view or page load variable, and Auto Event Variables for click events on the site.
- Folders make it so you can keep track of all your tags for a specific site separate then other tags like an App, or for specific systems like Google Analytics or Floodlight tags.
Creating the Google Analytics Tag
In May 2017, GTM came out with a new way of building the Google Analytics tag in the container so that it is easier to fire multiple different Universal Analytics ID’s (UA-ID’s) in the same tag. This link will send you to more information on the Google Analytics and Google Tag Manager update.
First, you’ll need to create a new tag by clicking the New Tag button. Once you click that button, you’ll get to choose from a list of options, and you want the Universal Analytics tag.
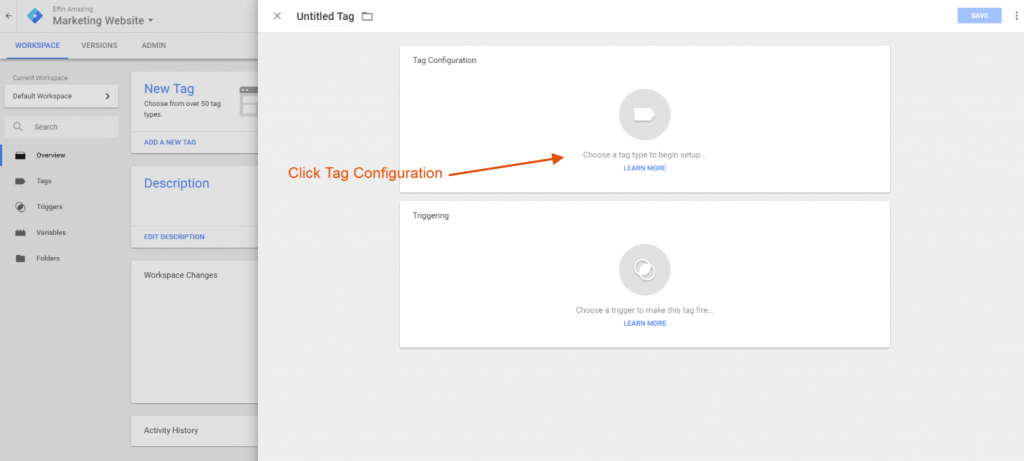
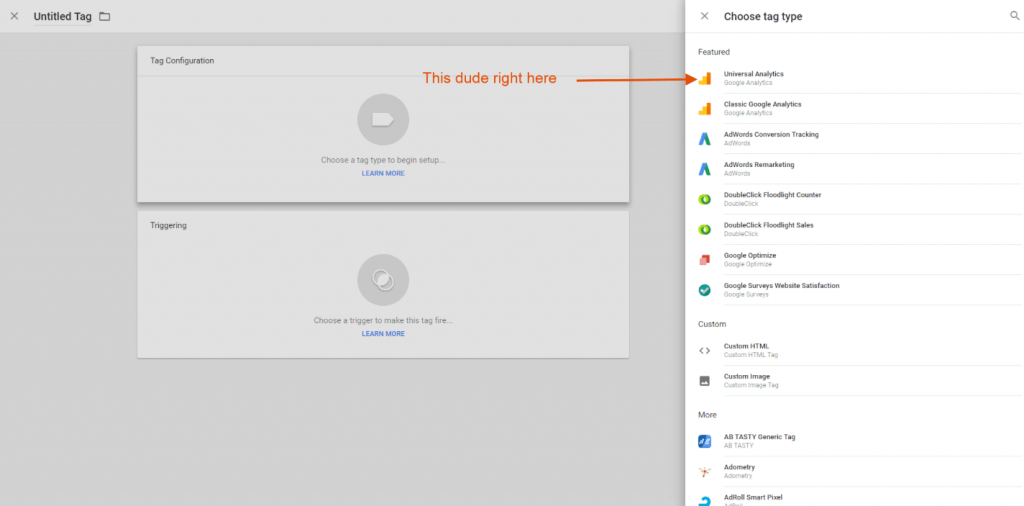
Once the Universal Analytics tag is selected, you can start building the tag that’s customized to the way we want it to fire on the site. This sends us to the screen below where we need to set our Universal Analytics ID as an actual variable to fire inside of the UA tag.
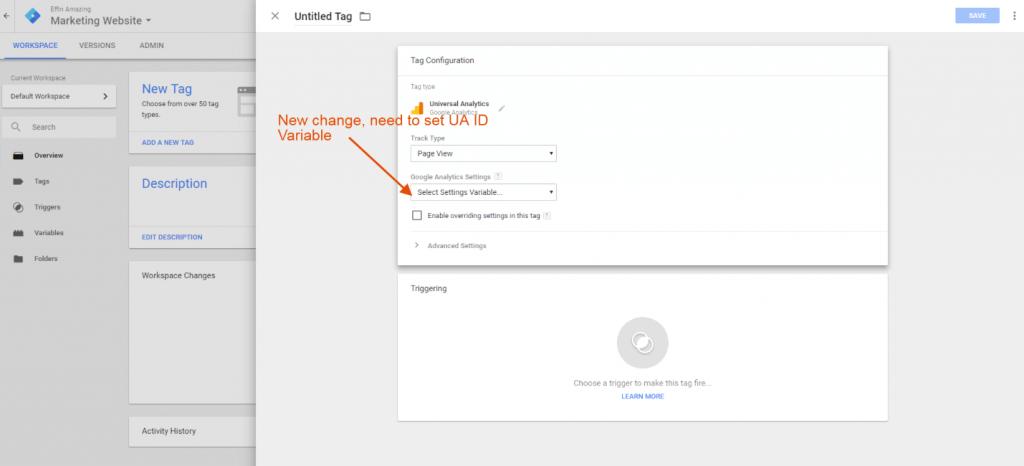
To do this, click on the drop down menu, select Create New Variable, and then input your UA-ID. This can be found by going to your Admin console in Google Analytics and looking in the Tracking Code under Property Settings. See below:
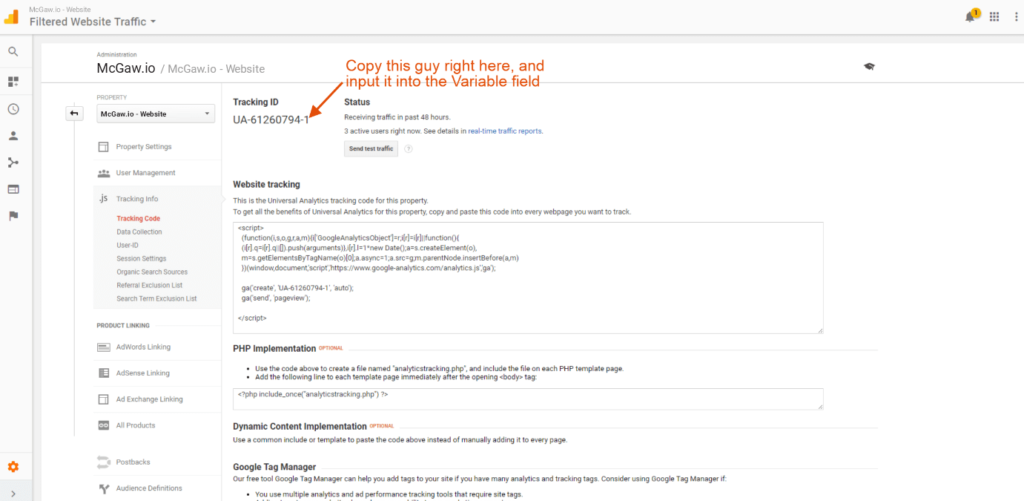
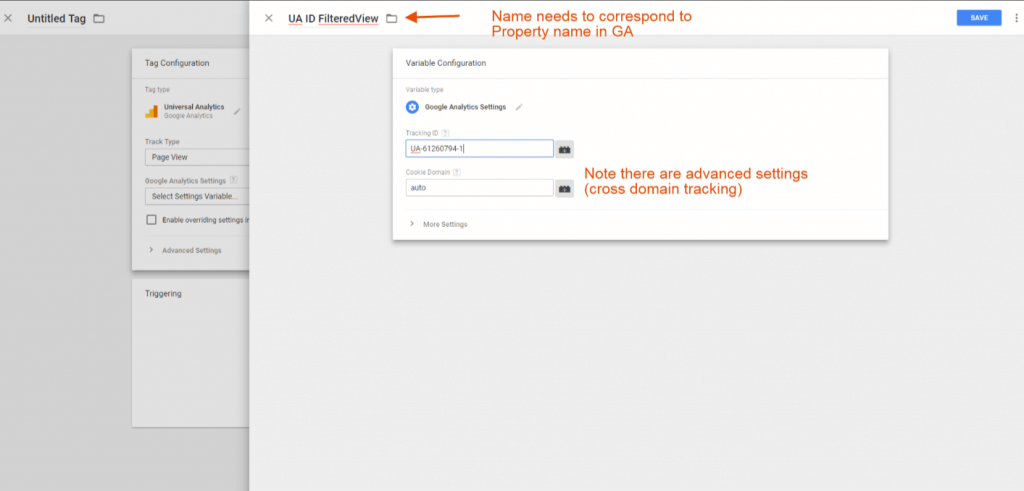
After you save your UA-ID variable, it will automatically pull the UA-ID into your Google Analytics tag. Notice that with advanced settings, you can set this UA-ID to be tracked across multiple domains for cross-domain tracking, but we’ll go into that in a later post.
Also, you’ll need to correspond the UA-ID with the Google Analytics Property name because you’ll usually have more than one UA-ID tag flowing into GTM, and you want to keep them straight.
Now we get to decide how to trigger this bad boy and start collecting data. Click on the trigger option at the bottom of the tag, and GTM will bring up all of your available triggers. For a GA Universal Tag, you’ll usually want All Pages (the default trigger in GTM), but that can change based on the way your site is set up and how your GA code is currently firing. You may want separate GA tags firing for separate sections of your site (think logged in vs logged out applications).
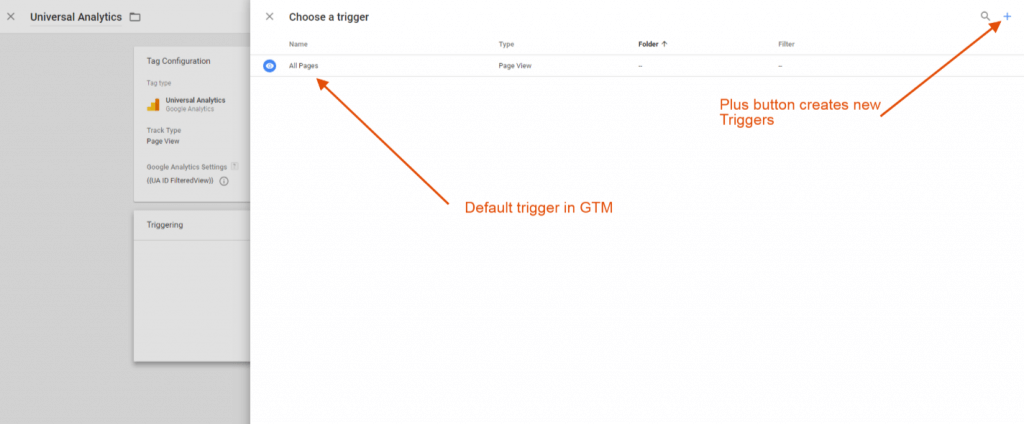
After setting the trigger for the tag, you’re ready to save this amazing UA tag and move on with your life conquering the world of Google Analytics. But wait, there’s a big red flag here!
Saving the tag does not mean that your tag will automatically start firing, it only means your attributes for that tag are saved in the GTM container. You actually have to publish the container for the tag to start firing.
Also, you’ll need to set a sweet name for your tag so that it’s easy to find in your tagging sequence on the site (see below).
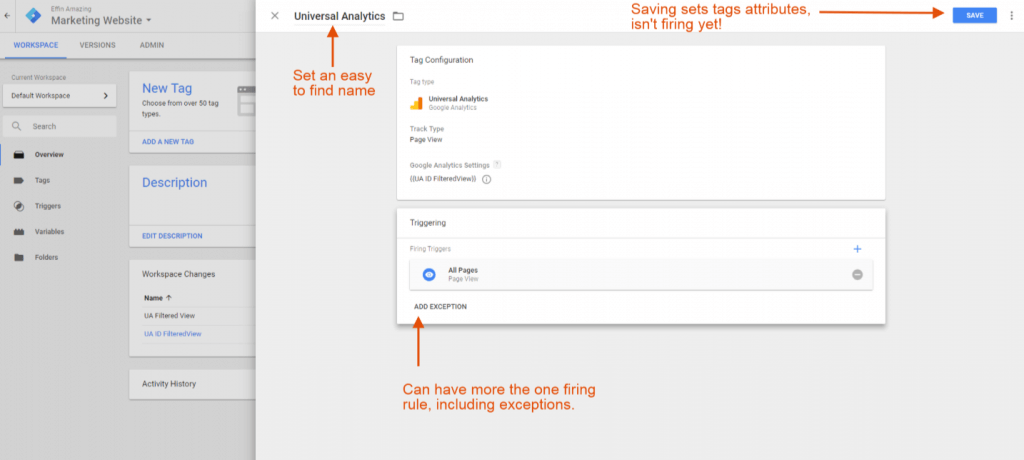
Note that you can have more than one firing rule, including exceptions. This is helpful if you have multiple different GA tags firing across multiple domains.
Once, the tag is saved, you’re back to the main container screen where you can see all the changes recently made in the Workspace, and you have the option to create more tags, previewing recently made tags, or submitting the changes to the container—and that will have the new tag start collecting data.
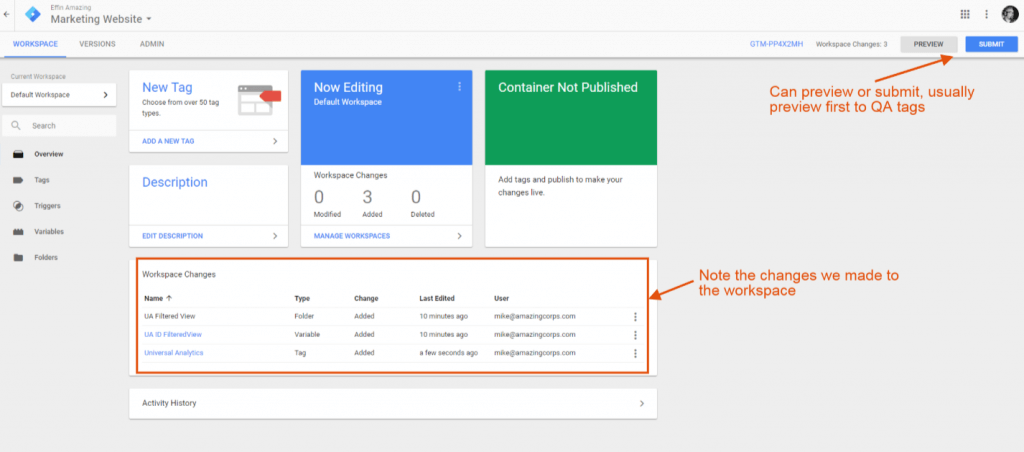
For QA purposes, you’ll always want to preview the tag before it fires on the site to make sure that it’s collecting the right data and isn’t breaking. This is a pretty slick process that GTM has come up with to help identify potential problems.
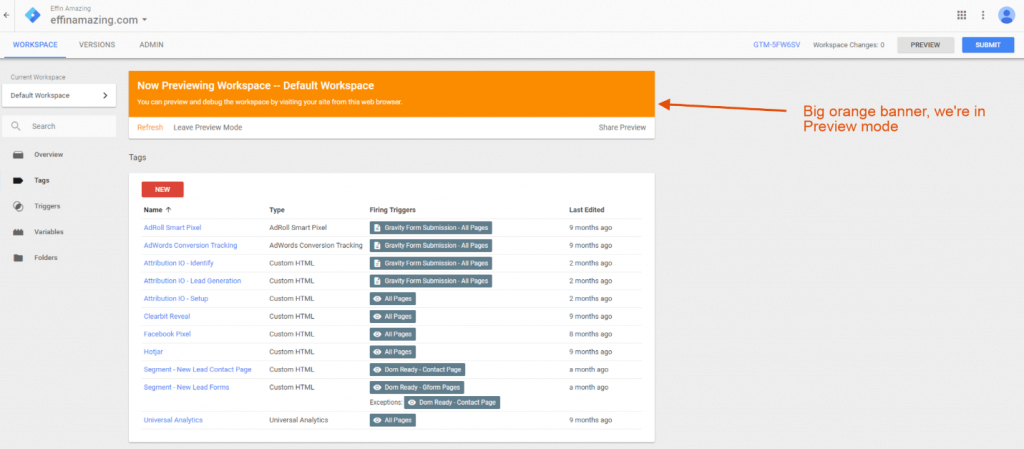
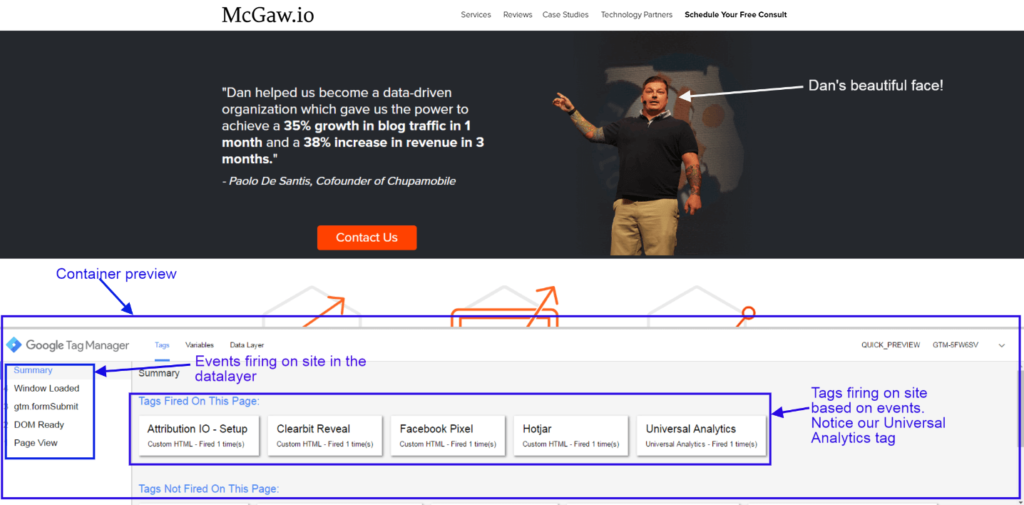
Click the Preview button and you’ll see a big orange banner come up that shows you’re in Preview Mode in GTM. Open your website in the same browser you have GTM open, and you’ll see the container preview window pop open at the bottom of your website.
Below, we can see the container preview pop up on the mcgaw.io site. Here we see the events that are firing inside the data layer on the page load, and the actual tags that are firing based on those events.
Now that you can see that the tag is firing correctly on your own site, you need to go in and submit the workspace changes to make sure that all of your changes are set and you start collecting GA data through GTM.
Click the submit button, and you’ll get the Version Control screen that lets you input a specific version description so you can keep track of where your changes happened if you ever need to revert to a previous version of the container.
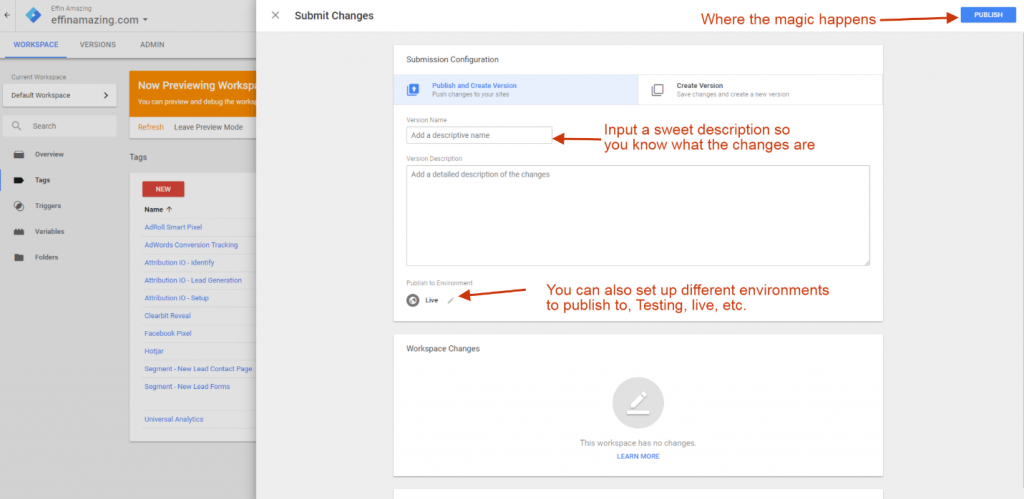
Once you click submit, your GA tag is now firing on the site through GTM! Look at you and your amazing GTM skills! See, that wasn’t so bad.
Summary
To review: GTM is awesome and you can do a ton of advanced cool stuff with Google Analytics when you start to utilize Google Tag Manager as the mechanism to input the code into the site.
Next time we’ll go over how to set up your funnel in GTM for lead generation by utilizing Click events and Auto Event Variables (YAY!).
As always, if you don’t want to go through this process and want a professional to make sure you’re not ruining the code on your site, hit us up! We can do a quick audit of your analytics code and walk through how you can change it to get greater insights.
Hello Mike,
Thanks for sharing the amazing article! It helps us a lot to implement the Google tag Manager for our client website.
Keep up the great work!
Thank you so much,
Saith V